



It is mid-autumn. The air is getting crisp. You are probably standing in your kitchen, staring at a cabinet full of blue-and-yellow sponges. They look identical. They wear out in weeks. They end up in the trash.
Why do we keep buying them?
The answer is hiding in your laundry basket or your donation pile. Old clothes. Stained tea towels. Those ugly burlap sacks that held potatoes. Turning these into DIY reusable sponges isn’t just a trend. It is a practical shift that saves money and stops waste.
The case against the disposable sponge
Let’s be honest about the conventional sponge. It is a single-use item disguised as a tool. Most store-bought sponges are made from synthetic materials like polyurethane foam. They are not easy to recycle. When you toss one in the bin, it sits there for years.
There is also the hygiene factor. Bacteria love damp, porous foam. You have to replace them every month or two just to keep things sanitary. That adds up. If you buy a pack every six weeks, you are spending significant money annually on something you throw away.
“Making your own sponges extends the life of textiles destined for the dumpster and drastically reduces waste.”
The DIY alternative solves this. You use textiles you already own. No new resources are extracted. The result is a cleaning tool that lasts for months, not weeks. And unlike the synthetic kind, your homemade sponge can go straight into the washing machine.
Two techniques for ultra-resistant DIY sponges
You do not need expensive patterns or special machinery. You just need a sewing machine or a needle and thread. Here are the two most reliable methods.
1. The Flannel Fold
This is the easiest method for beginners. Flannel is thick, absorbent, and soft. It holds water well without disintegrating.
What you need:
– Old flannel shirts or blankets
– Scissors
– Sewing machine or strong thread
– Optional: A button or loop for hanging
How to make it:
Cut your flannel into squares. Four inches by four inches is a good size for a hand-held sponge. Fold the square in half diagonally to create a triangle. Then, fold the two outer corners in to meet at the top point. This creates a thicker, layered diamond shape.
Sew around the edges, leaving a small opening if you want to add texture. Turn it right-side out. The layers provide multiple surfaces for scrubbing. Because flannel is dense, it won’t fall apart after ten washes.
2. The Terry Cloth Sandwich
Terry cloth is the stuff inside towels. It has loops that grab dirt and absorb liquid. This method creates a heavy-duty sponge for tough jobs.
What you need:
– Old bath towels or washcloths
– Scissors
– Sewing machine
– Zipper or hook-and-loop tape (optional, for a detachable cover)
How to make it:
Cut two identical rectangles of terry cloth. Stack them. Sew around three sides. Turn it right-side out through the open end. This creates a pocket.
For extra grip, you can insert a small piece of non-slip shelf liner or a
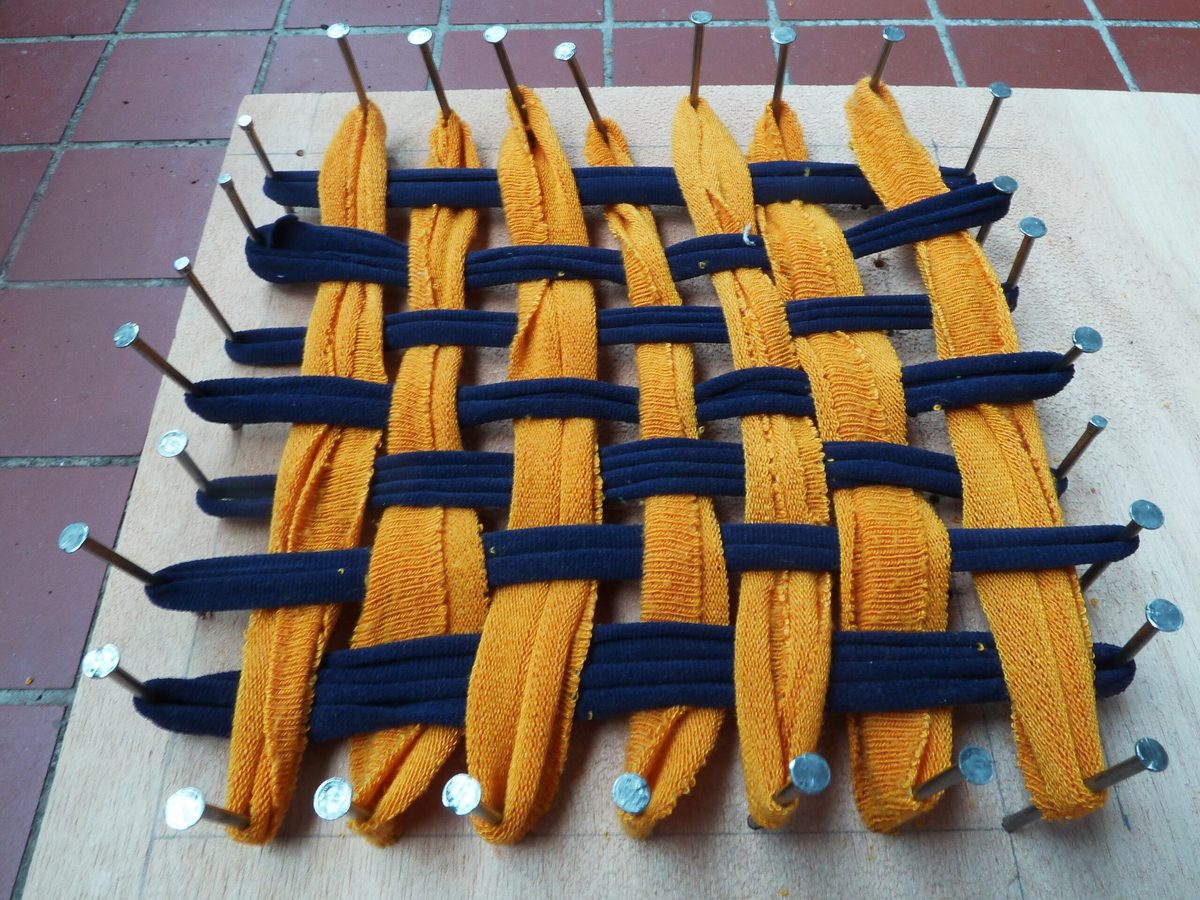

The Japanese Tawashi method: No sewing required
Forget the needle. You don’t need to be a beginner in sewing to make cleaning tools that actually last. The tawashi, a Japanese washcloth, relies on weaving, not stitching. It is tough. It is fast. And it turns trash into a scrubbing beast.
Grab some old clothes. T-shirts that have shrunk. Cotton stockings. Even those single socks you never matched. Cut them into strips. About two centimeters wide. Twenty centimeters long. Seven to ten strips per sponge.
You need a frame. A piece of cardboard or scrap wood works. Hammer in nails along two opposite edges. Space them about two centimeters apart. If you use cardboard, cut slits instead. Weave the fabric strips across the nails in a crisscross pattern. Pull tight. You get a thick, fluffy square.
This texture grips grime without scratching. Use it for dishes. Use it on the counter. It holds up to machine washing without falling apart. No glue. No thread. Just fabric and friction.
The double-face sponge: Absorbent meets abrasive
Sometimes you need water absorption. Sometimes you need to scrub a burnt pan. You can combine both in one tool. This method creates a two-sided cleaner. One side soaks up spills. The other side scrapes off dried food.
Cut two squares. Ten to twelve centimeters each.
- Side A: Old towel terry cloth. Vintage bath towel. It sucks up liquid instantly.
- Side B: Rough material. Sisal. Jute. A potato sack. Even a ripped onion netting works. This provides the grit.
Place them right sides together. Pinch the edges. Sew three sides shut. Leave one corner open. Turn the whole thing inside out through that hole. Stitch the opening closed by hand.
Add bulk if you want. Tuck in extra fabric scraps or natural sponge bits before you close the seam. The result is a heavy-duty pad. It survives the dishwasher. It tackles ceramic tiles. It handles stovetops without leaving streaks.
Care and longevity: Making them last
Home-made tools require less maintenance than store-bought sponges, which turn into bacterial traps quickly. Wash yours every five to seven days. Use hot water. Forty to sixty degrees Celsius.
Skip the fabric softener. It coats the fibers and kills absorption. Avoid harsh bleaches. They degrade the fabric faster. Rinse with plain water after every use. Let them dry completely. Moisture breeds mold.
If they start smelling funky, soak them in warm water with white vinegar. It kills odors. It disinfects. Store them in a way that allows airflow. Hang them. Don’t toss them in a damp drawer.
When they finally wear out, don’t throw them away. Cut the tawashi into smaller pads for cleaning windows. Shred the cotton for dusting. If the material is natural cotton or linen, compost it. Synthetic blends? Find a recycling bin.
This isn’t just about saving money. It’s about control. You choose the materials. You decide the texture. You make a tool that fits your specific mess. The winter cleaning marathon just got easier. And cheaper.


