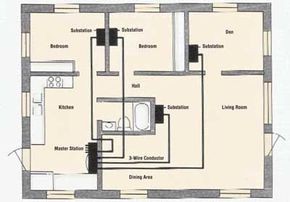
Start with your measurements. You need to know exactly where the master station goes. It sits between the wall studs. Pick a height that makes sense for your household. Do the same for your substations. These are the listening posts.
A home intercom is not just for calling people to dinner. It’s a paging system. You can add a radio for background music. You can add a front-door speaker for security. It keeps visitors at bay until you’re ready.
The cost is modest. The labor is moderate. You don’t need a degree in electrical engineering. Just some carpentry skills and steady hands. If you want to skip the wiring, look for battery-powered wireless modules. But if you want it hidden, you’re running cables.
Understanding the Hardware
Every system has a brain. That’s the master station. It holds the electronic circuitry for voice communications. If your system includes music, the master station holds the radio or tape player.
The other units are different. They are slave, remote, or sub-stations. You only listen and reply here. A substation contains a speaker. It doubles as a microphone when you hit the talk button. You switch modes with a simple lever or push-button.
A standard setup looks like this:
– One master station at a central location
– Several indoor substations
– One outdoor substation at the front door
The outdoor unit includes the doorbell button. It’s the first point of contact.
Wiring and Routing
You can hide the wires. Cut openings in the wall. Route the cables through the attic, basement, or crawl space. Keep it neat. Label every cable at both ends. You will thank yourself later when you’re troubleshooting.
The units are thin enough to sit flush against the wall. They slide into the holes you cut. The master station fits snugly between studs. Use underfloor joists to route the power and data lines.
More elaborate systems offer more control. You might want to monitor any substation. Or have privacy at a specific station without being eavesdropped on. Some systems let you call from substation to substation. Others let you broadcast music to all rooms at once.
In a basic setup, the master station controls everything. Power on/off. Radio on/off. Call selection. You can call one station or all at once. Only the called station can reply. Pressing push-to-talk cuts off the radio. The conversation takes precedence.
Installation Steps
Measure. Cut. Run the cables. Connect the wires. Install the units. Connect to power. Test the system. Replace any defective units or batteries.
The principles are simple. Apply them to a small home or a large building. The next section will walk you through a specific example: one master and four substations. But the logic remains the same.
Start with the master station. It’s the hub. Get it right.
Mapping the Master Station Location
Start by grabbing the master station enclosure. You need to know exactly how big the hole is before you cut into drywall. Most kits come with a mounting bracket or flange that sits flush against the interior of the wall.
Measure carefully. Find the studs first. You want to drop the hole between them, not into the wood. A height of five feet above the floor works for almost everyone. Mark the outline with a pencil.
Drill 3/8-inch pilot holes at the four corners. Switch to a saber saw or keyhole saw for the cut. Test the fit. If the box doesn’t slide in easily, trim the edges. Set the box aside. Don’t wire it yet.
Prepping the Substations
Repeat the process for each substation location. Cut the holes. Check the fit. Trim if needed.
Stack them up. You aren’t installing these until the wiring is complete. This keeps the work area clear and prevents damage to the faceplates.
Understanding the Wiring Diagram
Check the schematic. In a standard setup, only the master station needs a direct electrical connection. The substations are low-voltage links.
You need multiwire cable. If your kit didn’t include enough, buy intercom cable from an electronics supplier. Look for a jacketed cover. It protects the conductors and makes pulling through walls easier.
Running the Cables
Run one cable from each substation back to the master station. For a clean look, route wires down into the basement or crawl space, or up into the attic.
Pass the wires through holes in the joists. Keep them parallel to the joists where possible. You’ll need a larger entry hole in the floor or wall below the master station because all cables converge there.
Pull each wire up to the master station opening. Label them immediately. Use numbered pressure-sensitive tape. Knowing which wire goes to which room saves hours of guessing later.
Connecting the Substations
Strip the wires at each substation. Connect the three conductors to the terminals. Match the colors or codes stamped next to the screws.
Secure the unit to a wall stud. This gives it rigidity. Snap on the trim molding. It hides the rough edges of the cutout and makes it look professional.
Caution: If the master station plugs directly into mains power, turn off the breaker. Lock it out if possible. Someone flipping the switch while you’re working can be fatal. If there’s a transformer, mount it near the main panel or a junction box. Follow the manufacturer’s wiring instructions strictly.
Finalizing the Master Station
Connect the substation wires and the power line to the master station. Double-check every terminal marking.
Mount the master station into the wall cutout. Bolt it firmly to the studs. Attach the trim molding.
Restore power.
Testing and Maintenance
Flip the switch. Call each substation. Listen for clarity.
If one unit fails, check the terminal connections first. Loose wires are the most common culprit. If the wiring is solid, swap the substation with a known good unit. This isolates the fault. Is it the wire? Or the device?
Replace batteries in wireless units regularly. Write the date inside the cover. Dust builds up over time. Wipe the components down during routine checks.
Troubleshooting Home Intercom Systems
Electronic systems fail. Fuses blow. Wires corrode. If your intercom is staticky or dead, check the connections at both ends. Look for pinched wires behind the walls.
Check the fuse in the master station or transformer. Replace it if blown.
If you suspect a deeper issue, consult a dedicated troubleshooting guide. Often, the problem is simpler than it seems.
Frequently Asked Questions
Can I integrate a new intercom system with my existing home automation or security system?
Many modern systems allow integration. Check the compatibility list before buying. It adds a layer of control to your communication hub.
What maintenance is required for a home intercom system?
Clean the components. Dust affects sound quality. Check wireless battery levels. Ensure all wire connections remain tight. Loose terminals cause intermittent signals.